It is sometimes useful to see the raw bytes in a file, and for files
that contain text, to see what those bytes look like as characters in
various different encodings. In this article we'll review a complete
Python GUI program—short enough to type in—that provides this
facility, and shows how easy it is to create small graphical tools using
Python's built-in tkinter library.
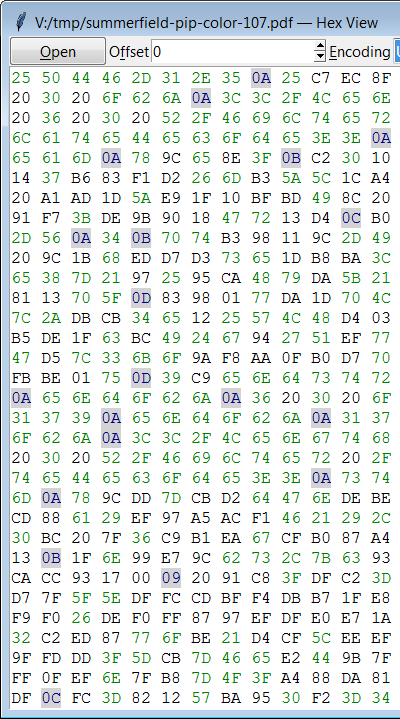
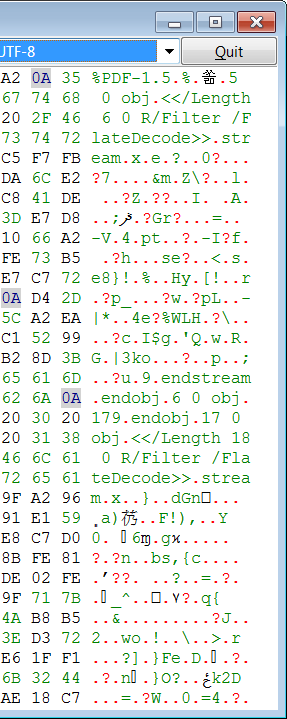
Here's the application shown running on Windows—it also runs on Linux and should work on any Unix/BSD system.
All the code should be put in a single plain text file called, say,
hexview.pyw. The file could be created by the IDLE editor
(which comes with Python—just, start it and then click
File→New File, and type in the code), or any other modern
Python-savvy code editor or IDE (e.g., the good and free Notepad++ on Windows).
We'll review the application's code in order from beginning to end, and so we will start with the imports.
#!/usr/bin/env python3
import os
import sys
import tkinter as tk
import tkinter.ttk as ttk
import tkinter.filedialog as filedialog
try:
    Spinbox = ttk.Spinbox
except AttributeError:
    Spinbox = tk.Spinbox
Most GUI libraries have so many components that people often use star
imports, for example: from tkinter.tk import *; from tkinter.ttk import
*. However, I prefer to simply use shorter names (tk,
ttk, and
filedialog) so that I can see what comes from where. Incidentally, the
first line is just a comment—but one that is used to determine which
Python to use, so while not strictly necessary, I recommend always
starting with it, even on Windows.
APPNAME = "Hex View"
BLOCK_WIDTH = 16
BLOCK_HEIGHT = 32
BLOCK_SIZE = BLOCK_WIDTH * BLOCK_HEIGHT
ENCODINGS = ("ASCII", "CP037", "CP850", "CP1140", "CP1252",
             "Latin1", "ISO8859_15", "Mac_Roman", "UTF-8",
             "UTF-8-sig", "UTF-16", "UTF-32")
These are the constants we'll need. The application will show 512 bytes at a time from a given byte offset using two digit hex numbers (00-FF) for each byte. It will also show those bytes as text using a user-specified encoding. Python supports lots of different text encodings: here we've just put in some common ones; you can easily add as many more as you like.
The application's functionality is encapsulated in its
MainWindow class,
which we'll review method by method.
class MainWindow:

    def __init__(self, parent):
        self.parent = parent
        self.create_variables()
        self.create_widgets()
        self.create_layout()
        self.create_bindings()
        if len(sys.argv) > 1:
            self._open(sys.argv[1])
When a MainWindow is created we store the parent that's passed in and
then use separate methods to set up various aspects of the user
interface. At the end we check to see if a filename was given on the
command line (sys.argv[0] contains the name of the program,
sys.argv[1]
and so on—if present—contain the command line arguments), and if
an argument is given, we assume it is a filename and attempt to open it
using the private MainWindow._open() method shown later.
Note that the __init__() method—and all the methods that follow it
(those whose first argument is self)—should be indented under the
MainWindow class declaration.
    def create_variables(self):
        self.filename = None
        self.offset = tk.IntVar()
        self.offset.set(0)
        self.encoding = tk.StringVar()
        self.encoding.set(ENCODINGS[0])
We keep track of the name of the file we're showing using a normal
string. But for the offset and encoding we create an IntVar and a
StringVar. These are special tkinter-specific types that hold a value
(an int and a str) which is set using a set() method and retrieved using
a get() method. We'll see shortly why we need to use these types.
    def create_widgets(self):
        frame = self.frame = ttk.Frame(self.parent)
        self.openButton = ttk.Button(frame, text="Open...", underline=0,
                                     command=self.open)
        self.offsetLabel = ttk.Label(frame, text="Offset", underline=1)
        self.offsetSpinbox = Spinbox(
            frame, from_=0, textvariable=self.offset, increment=BLOCK_SIZE)
        self.encodingLabel = ttk.Label(frame, text="Encoding", underline=0)
        self.encodingCombobox = ttk.Combobox(
            frame, values=ENCODINGS, textvariable=self.encoding,
            state="readonly")
        self.quitButton = ttk.Button(frame, text="Quit", underline=0,
                                     command=self.quit)
        self.create_view()
The user interface has an outer frame (the visible window) which
contains a couple of buttons (Open and Quit), some labels, and a spinbox
and a combobox. Every widget must have a parent (given as the first
argument to its constructor). Widgets from the ttk module are styled to
look native, unlike those from the tk module, so we prefer
ttk widgets
where available.
There are more ttk widgets than tk ones, with most
ttk widgets
superceding existing tk ones of the same name, and some
entirely new ttk
widgets not present in tk. However, there are a few tk widgets that have
no ttk equivalents.
When a button is clicked, the function or bound method given as its
command will be called. If an underline is specified, Tk will underline
that character (e.g., the ‘O’ in “Open” and the first ‘f’ in
“Offset”).
These underlines are used as visual cues telling the user that a press
of Alt+underlined_letter will perform an action. In the case of a
button, the press should have the same effect as clicking—but we
must program the behaviour ourselves, as we will see in the
create_bindings() method.
The spinbox's textvariable is set to the self.offset (of type
tk.IntVar). This means that if we change self.offset programmatically
(by calling self.offset.set()), the value set will automatically be
reflected in the spinbox—which is why we needed to use a
tk.IntVar
rather than a plain int. Correspondingly, if the user interactively
changes the value in the spinbox, the value they set will be reflected
back into the self.offset. In other words, the spinbox and its
textvariable (self.offset of type tk.IntVar) are automatically
synchronized. The same principle applies to the combobox and the
self.encoding (of type tk.StringVar)—except that here a string is
used rather than a number.
    def create_view(self):
        self.viewText = tk.Text(self.frame, height=BLOCK_HEIGHT,
                                width=2 + (BLOCK_WIDTH * 4))
        self.viewText.tag_configure("ascii", foreground="green")
        self.viewText.tag_configure("error", foreground="red")
        self.viewText.tag_configure("hexspace", foreground="navy")
        self.viewText.tag_configure("graybg", background="lightgray")
Tk provides a tk.Text widget which can display styled (“rich”) text.
It is possible to make a tk.Text widget support styled text editing up
to a point, but I've certainly never found a way to turn it into a fully
fledged styled text editor (so show me if you have!). Furthermore,
tk.Text has no built-in support for reading or writing styled text. Both
can be done using say, HTML, but we'd have to write our own code to do
it.
We can add as many tags as we like to a tk.Text widget, each with a
unique name (e.g., “error”), and with any number of configurable
properties. Here we just set colors, but it is possible to set font
attributes too. The tags themselves do nothing unless applied to
inserted text as we'll see further on.
    def create_layout(self):
        for column, widget in enumerate((
                self.openButton, self.offsetLabel, self.offsetSpinbox,
                self.encodingLabel, self.encodingCombobox,
                self.quitButton)):
            widget.grid(row=0, column=column, sticky=tk.W)
        self.viewText.grid(row=1, column=0, columnspan=6, sticky=tk.NSEW)
        self.frame.grid(row=0, column=0, sticky=tk.NSEW)
Tkinter has various layout managers, but the easiest to use is
grid.
Here we've put almost all the widgets as a single row along the top and
then put the self.viewText (of type tk.Text) below and set it to fill
the frame it is contained in (apart from the row of widgets above it).
And at the end we tell the containing frame to fill the application's
window.
    def create_bindings(self):
        for keypress in ("<Control-o>", "<Alt-o>"):
            self.parent.bind(keypress, self.open)
        for keypress in ("<Control-q>", "<Alt-q>", "<Escape>"):
            self.parent.bind(keypress, self.quit)
        self.parent.bind("<Alt-f>",
                         lambda *args: self.offsetSpinbox.focus())
        self.parent.bind("<Alt-e>",
                         lambda *args: self.encodingCombobox.focus())
        for variable in (self.offset, self.encoding):
            variable.trace_variable("w", self.show_block)
Apart from the last loop, this method is used to create keyboard bindings. The first two allow users to press Ctrl+O or Alt+O to click the Open button, and the second two let users press the Quit button by pressing either Ctrl+Q, Alt+Q, or Escape. If the user presses Alt+F we give the keyboard focus to the offset spinbox, and if they press Alt+E we give the focus to the encoding combobox.
After the user has clicked Open and chosen a file to view, we show the
file's first block using the current encoding. If the user wants to view
another block or change the encoding they can use the spinbox and
combobox. This works because in this method's last loop we have told Tk
that whenever a new value is written to the self.offset
(tk.IntVar) or
self.encoding (tk.StringVar) using their
set() methods, Tk should call
the show_block() method.
    def show_block(self, *args):
        self.viewText.delete("1.0", "end")
        if not self.filename:
            return
        with open(self.filename, "rb") as file:
            try:
                file.seek(self.offset.get(), os.SEEK_SET)
                block = file.read(BLOCK_SIZE)
            except ValueError: # Empty offsetSpinbox
                return
        rows = [block[i:i + BLOCK_WIDTH]
                for i in range(0, len(block), BLOCK_WIDTH)]
        for row in rows:
            self.show_bytes(row)
            self.show_line(row)
        self.viewText.insert("end", "\n")
This method (and its helpers, below) is the heart of the application. It
begins by deleting all the text in the self.viewText widget (from line 1,
column 0 to the end—the widget uses 1-based line numbers and 0-based
column numbers). If there's no filename, we're done. Otherwise we open
the file in read-only binary mode, seek to the given byte offset, and
read up to one block (512 bytes).
Once we have the block we need to split it into rows, each one
containing BLOCK_WIDTH bytes. This is done in a single statement
(rows = ...) where we step through the block from beginning to end in
BLOCK_WIDTH steps and creating a list of bytes objects (i.e., read-only
byte arrays) of BLOCK_WIDTH bytes using a list comprehension.
Alternatively we could have done:
rows = []
for i in range(0, len(block), BLOCK_WIDTH):
    rows.append(block[i:i + BLOCK_WIDTH])
At the end of the method we iterate over each row and show its bytes
followed by the decoded text represented by those bytes in the
self.viewText widget, and finish by adding a newline at the end.
Is it inefficient opening the file every time we need to show a 512 byte
block, and then closing it again? In theory, yes, but in practice it
doesn't matter. First, because a modern operating system will read not
just 512 bytes but a bigger chunk (4K, 8K, 16K or more), and this will
stay in a RAM buffer so most subsequent calls will be to RAM not disk.
Second, even if we set an offset that's outside the buffer and require a
fresh disk read, by the time the user has finished changing the
spinbox's offset (e.g., by pressing and releasing the Up arrow key, or
by entering a number), the computer has about 200 milliseconds to
respond before the user will notice any delay. This is far more time
than is needed to do a disk read (even from a physical spinning disk),
and repopulate the self.viewText tk.Text widget.
    def show_bytes(self, row):
        for byte in row:
            tags = ()
            if byte in b"\t\n\r\v\f":
                tags = ("hexspace", "graybg")
            elif 0x20 < byte < 0x7F:
                tags = ("ascii",)
            self.viewText.insert("end", "{:02X}".format(byte), tags)
            self.viewText.insert("end", " ")
        if len(row) < BLOCK_WIDTH:
            self.viewText.insert("end", " " * (BLOCK_WIDTH - len(row)) * 3)
This method iterates over every byte in the row it is given and adds
each one to the self.viewText widget. If the byte is whitespace or in the
printable 7-bit ASCII range, we add suitable tags for coloring the
foreground and/or background. We insert each byte as a two-digit
uppercase hexadecimal number with the formatting tags followed by a
plain unformatted space. If there are less than BLOCK_WIDTH bytes (e.g.,
the last row of the file), we pad with spaces allowing three per byte,
two for the hex digits, and one for the following space.
    def show_line(self, row):
        for char in row.decode(self.encoding.get(), errors="replace"):
            tags = ()
            if char in "\u2028\u2029\t\n\r\v\f\uFFFD":
                char = "."
                tags = ("graybg" if char == "\uFFFD" else "error",)
            elif 0x20 < ord(char) < 0x7F:
                tags = ("ascii",)
            elif not 0x20 <= ord(char) <= 0xFFFF: # Tcl/Tk limit
                char = "?"
                tags = ("error",)
            self.viewText.insert("end", char, tags)
        self.viewText.insert("end", "\n")
After writing the bytes in hex, this method is used to write them as
text. We decode the bytes into characters using the encoding set by the
user, replacing any that can't be decoded by the Unicode U+FFFD
replacement character. If the character is a Unicode whitespace or the
replacement character we represent it with a full-stop and also set a
tag color. If the character is outside the Basic Multilingual Plane
(BMP), we represent it with a question mark and set the error tag
color. (Python strings can handle all Unicode characters, but
unfortunately tkinter widgets are limited to those in the BMP.) Once we
have the character to display and its tags, we insert it into the
self.viewText widget. And after all the row's characters have been
inserted, we insert a newline ready for the next row.
    def open(self, *args):
        self.viewText.delete("1.0", "end")
        self.offset.set(0)
        filename = filedialog.askopenfilename(title="Open — {}".format(
                                              APPNAME))
        self._open(filename)
When the user clicks the Open button this method is called. It starts by
clearing the self.viewText widget and then sets the offset to 0. It then
pops up the platform-specific file open dialog and then calls the same
private MainWindow._open() method that we saw called in the
__init__()
method.
    def _open(self, filename):
        if filename and os.path.exists(filename):
            self.parent.title("{} — {}".format(filename, APPNAME))
            size = os.path.getsize(filename)
            size = (size - BLOCK_SIZE if size > BLOCK_SIZE else
                    size - BLOCK_WIDTH)
            self.offsetSpinbox.config(to=max(size, 0))
            self.filename = filename
            self.show_block()
This method begins by checking to see if the filename it was given is
non-empty (and not None) and exists in the file system. If these checks
pass, the method next updates the application's title to include the
filename. It then computes the maximum offset to allow—a value less
than the number of bytes so that if the user runs the spinbox to its
maximum, some bytes from the file will still be visible. Then the
filename is stored and show_block() is called to show the file's first
block.
    def quit(self, event=None):
        self.parent.destroy()
If the user clicks the Quit button (or clicks the window's X close
button), this method is called. It tells the parent (the app variable)
to destroy itself leading to a clean termination. This is the last
MainWindow method.
The final few lines are top-level, that is, not indented at all.
app = tk.Tk()
app.title(APPNAME)
window = MainWindow(app)
app.protocol("WM_DELETE_WINDOW", window.quit)
app.resizable(width=False, height=False)
app.mainloop()
Tkinter doesn't really have an application object, instead it provides
an invisible top-level window which we use as the parent of a real
visible window. If the user clicks the application window's X close
button the MainWindow's quit() method will be called. Since we always
show a fixed block of 512 bytes we've made the window non-resizable.
Calling mainloop() starts the GUI event loop and the method doesn't
return until the application is terminated.
There are many improvements that could be made. One would be to color
alternate rows with different backgrounds such as white and a very light
color, to make them easier to see. Another would be to add a vertical
scrollbar with the same range as the offset spinbox and synchronized
using the same self.offset tk.IntVar. (In this case we'd probably be
best off setting the offset spinbox's to value to the full size of the
file.)
There are many Python GUI libraries available. Tkinter is small, fast, and comes with Python—it is excellent for creating tiny applications like Hex View. But for more substantial applications, especially those requiring sophisticated custom widgets, I recommend using PySide (which is what I use), or PyQt, or wxPython instead.
For more see Python Programming Tips
Your Privacy • Copyright © 2006 Qtrac Ltd. All Rights Reserved.